Master Rapid Prototyping by Understanding Low-Resolution vs. High-Resolution Prototypes
In the fast-paced world of product development, Rapid Prototyping is the name of the game. It’s critical to be able to quickly turn concepts into tangible prototypes that you can test and refine. But, before you get lost in the details of making your first model, it’s important to understand the spectrum of fidelity that can exist within prototyping. Fidelity (or resolution) refers to the level of detail and functionality included in your prototype. The higher the fidelity, the closer your prototype should look and function like the final product.
Having a physical prototype on hand during early design stages will enable you to answer critical questions early on like:
- How will it be used?
- Who will interact with it?
- What does a typical use case look like?
- Where will it be used and why?
Are you looking to leverage the power of Rapid Prototyping for your next project? At Root3 Labs, we’re experts in helping you bring your ideas to life at every stage of development. Contact us today to discuss how we can help you develop the perfect prototype!
By prioritizing getting this feedback early in your development cycle, you can filter out the weaker concepts and refine the best ones before investing heavily in development. Using this approach means you’ll develop faster, reduce your risk, and produce an overall better product. The best way to get this valuable early feedback is to use Low-Resolution Prototyping techniques.
Low-Resolution Prototypes: Rapid Prototyping Made Fast and Flexible
Imagine bringing your ideas to life in minutes or hours, instead of days or weeks. That’s the beauty of low-resolution prototypes! These prototypes are all about exploring core functionalities and user interactions in the early stages of development.
Think of them as rough sketches taking shape in 3D. They’re typically made from readily available materials like cardboard, wood, or foam. Forget about precise dimensions or particular finishes – the focus here is on rapidly testing concepts and gathering valuable user feedback.
Advantages
- Speed and Efficiency: Low-resolution prototyping techniques are quick and inexpensive, allowing you to explore multiple design concepts rapidly.
- Early Feedback: Get valuable user input early in the design process to identify potential issues and refine your design.
- Cost-Effective: Since low-resolution prototypes use readily available materials, they’re a budget-friendly way to test your ideas.
Disadvantages
- Limited Detail: Low-resolution prototypes don’t capture the finer details of your design, making it difficult to assess the user experience with any precision. If you need to test precise tolerances, or finesse some tricky timing, the limited detail of low-resolution probably won’t serve your needs.
- Focus on Function: Low-resolution techniques prioritize function over form, so your low-res prototype won’t be ideal if you need to show off your device’s visual appeal.
- Durability Concerns: These prototypes aren’t meant to withstand extensive testing or excessive handling.
High-Resolution Prototypes: Refining the Experience
As you move further along in your development process and your design matures, you may need a prototype that more closely reflects the final product. A High-Resolution Prototype is more polished and will more closely resemble the intended final product in appearance, functionality, and user experience. These prototypes will feature intricate details, realistic materials, and in some cases even fully fleshed out interactive elements.
Think of them as near-finished models that allow for in-depth user testing and stakeholder buy-in. They might involve CNC machined parts, 3D printed components, or even functional software mock-ups.
Advantages
- User Testing: High-Resolution prototypes allow for more comprehensive user testing, providing valuable insights into how your user will interact with the final product’s look and feel.
- Refined Design Decisions: Making your prototype with high-resolution techniques can help you identify and address any usability issues before production begins.
- Stakeholder Buy-In: These more polished models can really impress potential investors and stakeholders, helping you secure funding and support.
Disadvantages
- Time and Resource Intensive: High-resolution prototyping techniques require more time, effort, and resources compared to low-resolution techniques.
- Focus on Aesthetics: Users might get overly focused on visuals and overlook the core functionalities you’re trying to test.
Choosing the Right Resolution for Rapid Prototyping
Now that you understand the strengths and weaknesses of both rapid prototyping approaches, let’s answer the question: when to use which?

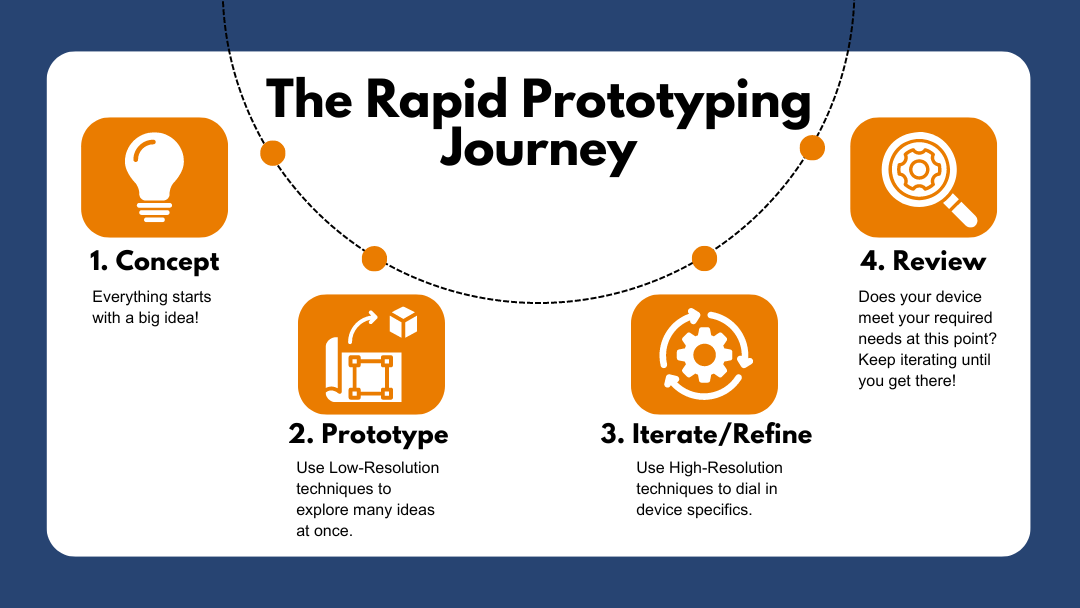
The key to successful rapid prototyping lies in using the right tool at the right time. TL;DR:
- Conception and Early Prototyping: When exploring multiple concepts and gathering initial user feedback, Low-Resolution Prototypes are what you’ll need.
- Iteration and Refinement: As your design solidifies and you need to refine user experience and functionality, switch to High-Resolution Prototypes.
Remember, the best approaches almost always involve a combination of both. The bonus advantage of rapid prototyping lies in its flexibility! Leverage Low-Resolution techniques for early exploration and initial testing, and iterate with High-Resolution prototypes to ensure a polished final product.
By understanding both Low-Resolution and High-Resolution Prototypes, you can make informed decisions throughout your rapid prototyping process. Low-resolution prototypes ensure you can explore multiple ideas quickly and efficiently, while high-resolution prototypes allow you to refine your design, and secure stakeholder buy-in. Understanding when to utilize both prototyping techniques will help with delivering a final product on time, under budget, and with serious confidence behind your design.


